Audio Post Production Algorithms (Singletrack)
The Auphonic Audio Post Production Algorithms analyze a master stereo/mono audio file and correct level differences between speakers, between music and speech and between multiple audio files to achieve a balanced overall loudness.
They include automatic Audio Restoration Algorithms, a True Peak Limiter and targets for common Loudness Standards (EBU R128, ATSC A/85, Podcasts, Mobile, etc.).
All algorithms were trained with data from our web service and they keep learning and adapting to new audio signals every day.
Audio examples for all algorithms with detailed annotations can be found at:
https://auphonic.com/features
Adaptive Leveler
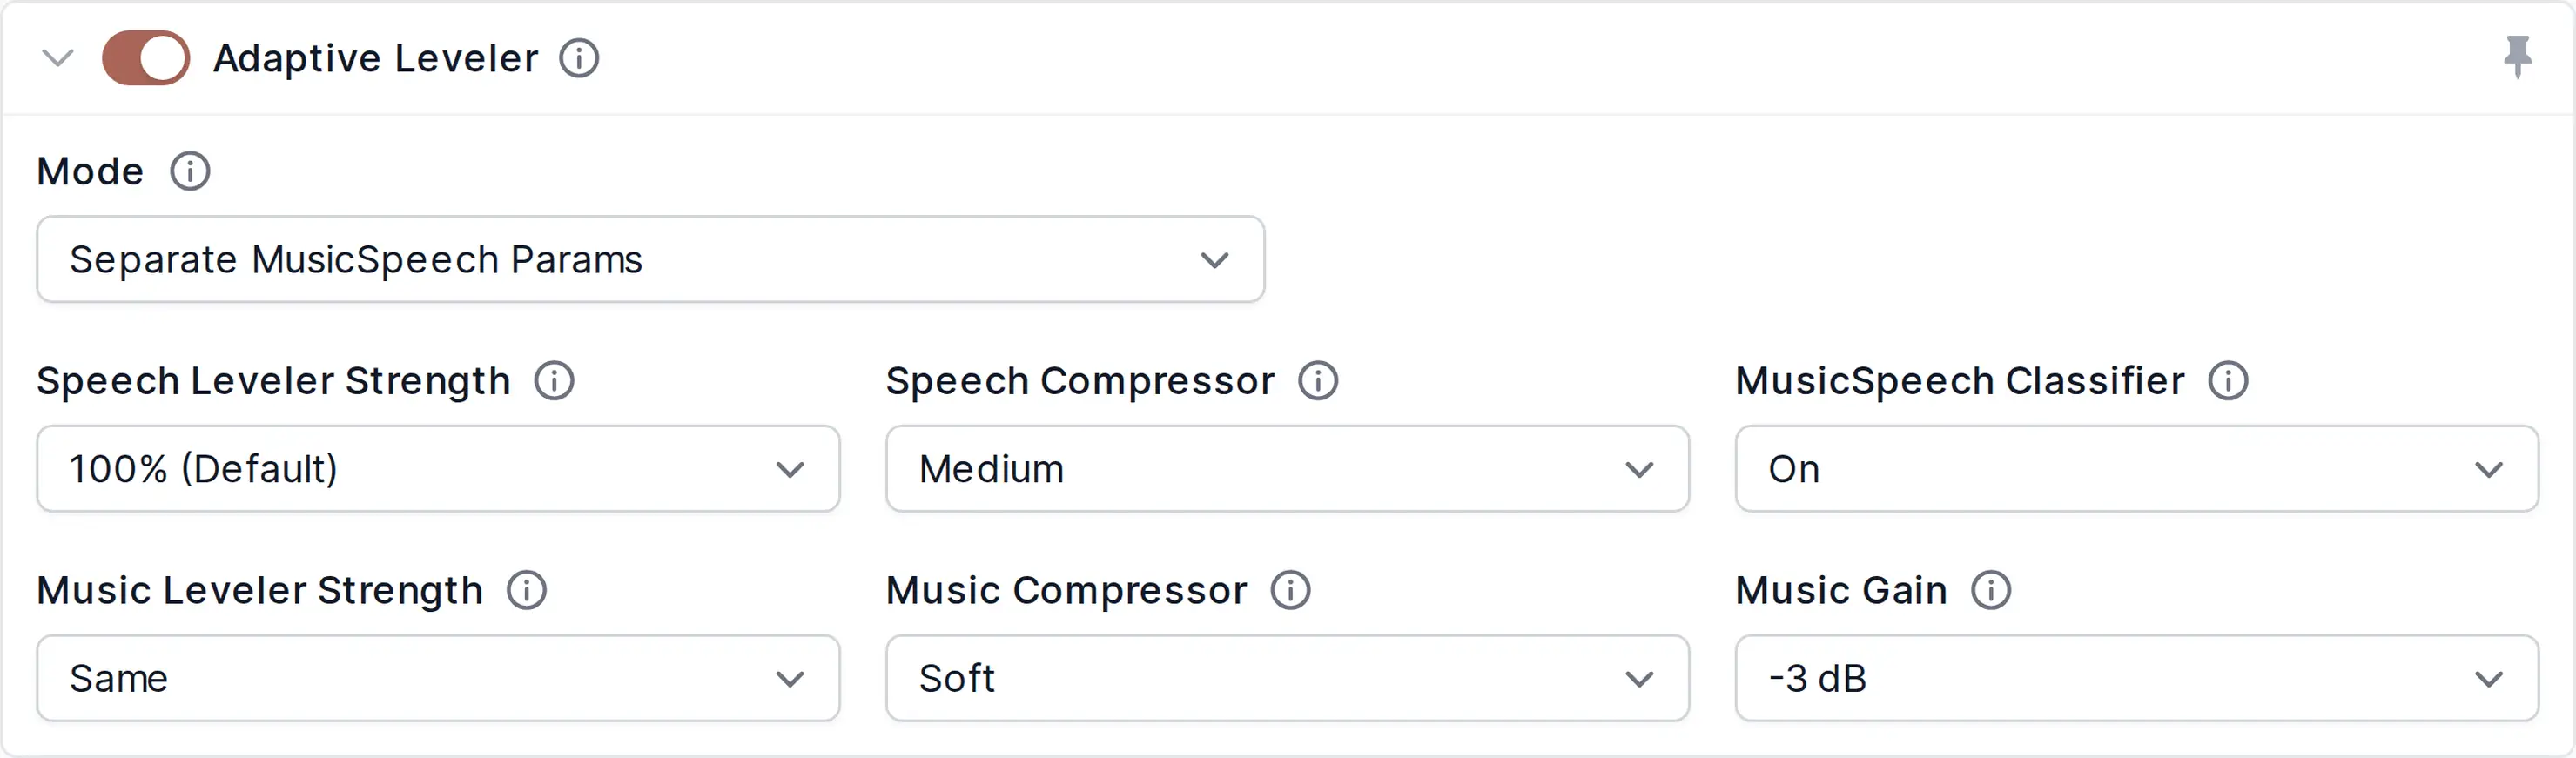
The Auphonic Adaptive Leveler corrects level differences between several speakers, or between music and speech and applies dynamic range compression to achieve a balanced overall loudness. In contrast to our Global Loudness Normalization Algorithms, which correct loudness differences between files, the Adaptive Leveler corrects loudness differences between segments within one file.
The algorithm was trained with over five years of audio files from our Auphonic Web Service and keeps learning and adapting to new data every day!
We analyze an audio signal to classify speech, music and background segments and process them individually by:
Amplifying quiet speakers in speech segments to achieve equal levels between speakers.
Carefully processing music segments so that the overall loudness will be comparable to speech, but without changing the natural dynamics of music as much as in speech segments.
Classifying unwanted segments (noise, wind, breaths, silence etc.) and then excluding them from being amplified.
Automatically applying compressors and limiters to get a balanced, final mix (see also Loudness Normalization and Compression).
Our Adaptive Leveler is most suitable for programs where dialog or speech is the most prominent content: podcasts, radio, broadcast, lecture and conference recordings, film and videos, screencasts etc.
For all details about parameter settings, please see: Audio Algorithms
Listen to Adaptive Leveler Audio Examples:
https://auphonic.com/features/leveler
Loudness Specifications and True Peak Limiter

Our Loudness Normalization Algorithms calculate the loudness of your audio and apply a constant gain to reach a defined target level in LUFS (Loudness Units relative to Full Scale) or RMS, so that multiple processed files have the same average loudness.
In combination with parameters of our Adaptive Leveler, you can define a set of parameters like integrated loudness target, maximum true peak level, MaxLRA, MaxM, MaxS, dialog normalization, ect., which are described in detail in Audio Algorithms.
The loudness is calculated according to the latest broadcast standards, so you never have to worry about admission criteria for different platforms or broadcasters again:
Auphonic supports loudness targets for television (EBU R128, ATSC A/85), radio and mobile (-16 LUFS: Apple Music, Google, AES Recommendation), Amazon Alexa, YouTube, Spotify, Tidal (-14 LUFS), Netflix (-27 LUFS), Audible / ACX audiobook specs (-18 to -23 db RMS) and more.
For more detailed information, please see our articles about: Audio Loudness Measurement and Normalization, Loudness Targets for Mobile Audio, Podcasts, Radio and TV, The New Loudness Target War, and RMS-based Loudness Normalization for Audible / ACX.
A True Peak Limiter, with 4x oversampling to avoid intersample peaks, is used to limit the final output signal and ensures compliance with the selected loudness standard.
We use a multi-pass loudness normalization strategy based on statistics from processed files on our servers, to more precisely match the target loudness and to avoid additional processing steps.
Listen to Loudness Normalization Audio Examples:
https://auphonic.com/features/loudnorm
Noise and Reverb Reduction
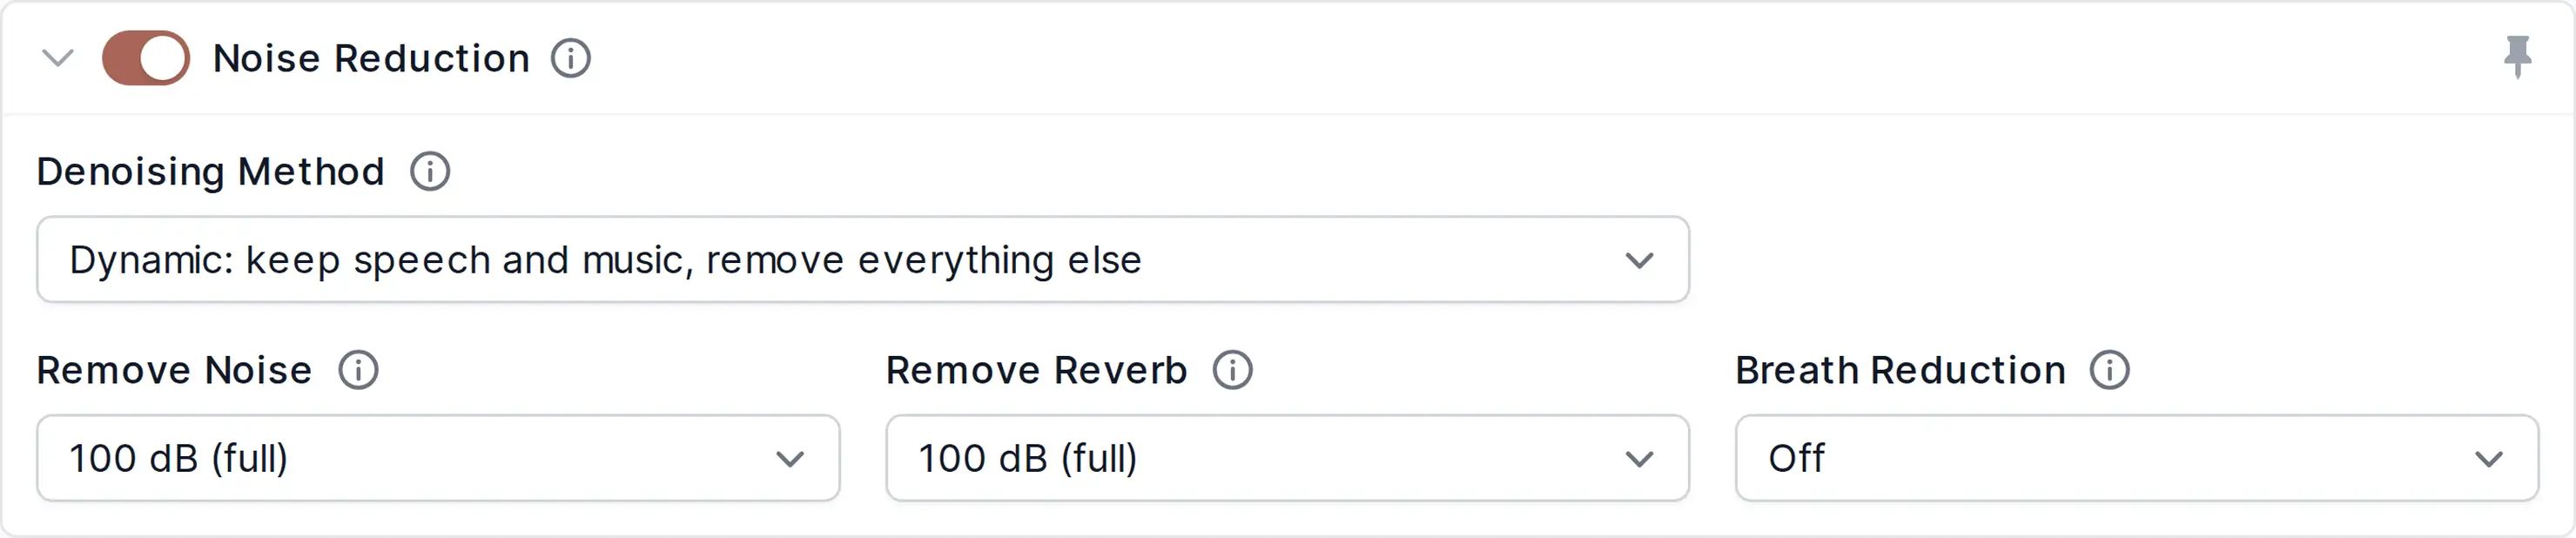
In the Auphonic Web Service, you can choose from four methods to define which kind of noise you want to reduce:
The Static Denoiser removes reverb and stationary, technical noises, while our Dynamic Denoiser removes everything but voice and music. Select Speech Isolation if you only want to keep speech, so all noise and even music will be removed. The Classic Denoiser also removes static noise, but it works only if there is a short silent segment, where a noise print can be extracted.
For maximum flexibility, with Speech Isolation, Dynamic Denoiser and Static Denoiser, you can separately control the reduction amounts:
Remove Noise: Reduce this amount, if you don’t want to completely eliminate the noise, but keep some atmosphere.
Remove Reverb: Reduce this amount to quietly keep the reverberation for a spatial impression.
Remove Breaths: Reduce this amount to keep breath sounds in your breath meditation recording. (not available for Static Denoiser)
These parameters allow you to increase the speech intelligibility while preserving a natural feel if desired.
For more details about all available parameters, please see Noise Reduction Settings.
Listen to Noise Reduction Audio Examples:
https://auphonic.com/features/denoise
Dynamic Denoiser
The Dynamic Denoiser preserves speech and music signals but removes everything else from your audio or video file. It is perfectly used to remove fast-changing and complex noises in situations like:
Crowded Places: Chatter and noises from people in the background.
Outdoor Recordings: Clean up background noises like wind or traffic.
Breakfast Interview: Get rid of mouth noises and clinking dishes from eating during a recording session.
Large rooms: Eliminate echo and reverberation.
Enthusiastic Speech: Remove unwanted inhalation and exhalation sounds.
During the analysis of an audio signal, there is metadata generated, classifying contents such as spoken word, music in the foreground or background, different types of noises, silence, and more. Based on this metadata, the audio is processed with AI algorithms, that are permanently changing over time, to apply the best matching settings for every tiny segment of your audio. These adaptive noise reduction algorithms take care, that a consistent, high sound quality is produced throughout the entire recording while removing as many unwanted noises as possible.
Please pay attention not to use the Dynamic Denoiser, if you want to keep sound effects or ambient sounds in any kind of audio play content!
Speech Isolation
Our Speech Isolation algorithms do only isolate speech, but remove everything else, including music, from your audio or video file. It is perfectly used with speech recordings containing music and fast-changing, complex noises. For example:
Videos: Increase the speech intelligibility by reducing or completely removing the background music of your video.
Bar Interview: Silence music, clinking glasses, and chatter from the background.
Home Recordings: Clean up noise from your neighbor rumbling and practicing piano.
During the analysis of an audio signal, there is metadata generated, classifying contents such as spoken word, music in the foreground or background, different types of noises, silence, and more. Based on this metadata, the audio is processed with AI algorithms, that are permanently changing over time, to apply the best matching settings for every tiny segment of your audio. These adaptive noise reduction algorithms take care, that a consistent, high sound quality is produced throughout the entire recording while removing as many unwanted music and noises as possible.
Please pay attention not to use Speech Isolation algorithms, if you want to keep jingles, sound effects, or ambient sounds in any kind of audio play content!
Static Denoiser
The Static Denoiser algorithm removes reverb and slowly varying broadband background noise from audio files even when music is in the mix. Static denoising is the perfect choice for any kind of audio drama or guided music meditation, where you want to keep music, sound effects or ambient sounds, like a rainforest soundscape.
In contrast to the Classic Denoiser, which extracts and subtracts noise profiles from silent segments of your audio, the Static Denoiser uses AI algorithms for noise detection and can thus also remove static noise from recordings with continuous music.
Per default the Static Denoiser is set to full reverb and static noise reduction. But you can, for instance, also manually set the parameter Remove Reverb to a lower value, if you prefer to keep some reverb.
However, be aware that you can not remove any non-static noises (e.g. vinyl crackling) or breath sounds with the Static Denoiser. If you want that, you might consider using the Dynamic Denoise or the Speech Isolation methods.
Classic Denoiser
Our Classic Denoiser (former version of our Static Denoiser) algorithms only remove broadband background noise and hum from audio files with slowly varying backgrounds when there is no music. For the Classic Denoiser to work, the input audio must have a silent segment from which a noise profile can be extracted. Therefore, it should only be used for any kind of audio play content with broadband hiss and hum but no music, where you want to keep sound effects or ambient sounds, like a singing bird in your ornithology podcast.
First, the audio file is analyzed and segmented into regions with different background noise characteristics, and subsequently, Noise Prints are extracted for each region.
Per default, there is also Hum Reduction activated with the Classic Denoiser. If any hum is present in the recording, the hum base frequency (50Hz or 60Hz) and the strength of all its partials (100Hz, 150Hz, 200Hz, 250Hz, etc.) are also identified for each region.
Based on this metadata of all analyzed audio regions, our classifier finally decides how much noise and hum reduction is needed in each region and automatically removes the noise and hum from the audio signal.
You can also manually set the parameter Remove Noise, if you prefer more noise reduction. However, be aware that high noise reduction amounts might result in artifacts!
Usage Tips for Classic Denoiser
Keep the noise as natural and constant as it is, don’t try to improve or hide it yourself!
Please do not use leveling or gain control before our noise reduction algorithms! The amplification will be different all the time and we will not be able to extract constant noise prints anymore.
This means: no levelator, turn off automatic gain control in skype, audio recorders, camcorders and other devices …No noise gates: we need the noise in quiet segments, which noise gates try to remove!
Excessive use of dynamic range compression may be problematic, because noise prints in quiet segments get amplified.
Noise reduction might be problematic in recordings with lots of reverb, therefore try to keep the microphone close to your speakers!
Adaptive Filtering
High-Pass Filtering
Our adaptive High-Pass Filtering algorithm cuts disturbing low frequencies and interferences, depending on the context.
First we classify the lowest wanted signal in every audio segment: male/female speech base frequency, frequency range of music (e.g. lowest base frequency), noise, etc. Then all unnecessary low frequencies are removed adaptively in every audio segment, so that interferences are removed but the overall sound of the audio is preserved.
We use zero-phase (linear) filtering algorithms to avoid asymmetric waveforms: in asymmetric waveforms, the positive and negative amplitude values are disproportionate - please see Asymmetric Waveforms: Should You Be Concerned?.
Asymmetrical waveforms are quite natural and not necessarily a problem. They are particularly common on recordings of speech, vocals and can be caused by low-end filtering. However, they limit the amount of gain that can be safely applied without introducing distortion or clipping due to aggressive limiting.
Voice AutoEQ Filtering
The AutoEQ (Automatic Equalization) automatically analyzes and optimizes the frequency spectrum of a voice recording, to avoid speech that sounds very sharp, muddy, or otherwise unpleasant.
Using Auphonic AutoEQ, spectral EQ profiles are created for each speaker separately and permanently changing over time. The aim of those time-dependent EQ profiles is to create a constant, warm, and pleasant sound in the output file even if there are slightly changing voices in the record, for example, due to modified speaker-microphone positions.
For singletrack productions with more than one speaker, equalizing is also a very complex and time-consuming process, as every voice has its unique frequency spectrum and needs its own equalization. Without an AutoEQ feature one would have to manually split each speaker into separate tracks or create a track envelope to tediously fade from one speaker to another.
Plosive reduction (De-Plosive) to lower strong ‘ppp’ or ‘ttt’ pop-sounds in speech, is built into both the AutoEQ and the Noise Reduction algorithms. De-Plosive is applied when AutoEQ is enabled on its own, or either “Dynamic Denoiser” or “Speech Isolation” are active. For the most effective plosive removal, use AutoEQ together with one of the mentioned Denoising Methods, as both algorithms contribute to reducing plosives. Note that De-Plosive is not applied when only the “Classic” or “Static Denoiser” and “Adaptive high-pass filtering” is used.
For more details, please also see our blog post on Auphonic AutoEQ Filtering.
Bandwidth Extension
Voice AutoEQ + Bandwidth extension (BWE) artificially recreates higher audio frequencies that may have been lost or limited during recording, transmission, or compression. By analyzing the existing frequency information in an audio signal, our algorithm can predict and synthesize additional higher-frequency components. This approach restores the brightness and clarity of muffled, low-quality audio in voice calls or old recordings to make it sound more natural and pleasant to listeners.
The Auphonic Bandwidth Extension always includes the Voice AutoEQ and is similarly designed specifically for voice enhancement without affecting your carefully chosen music and without emphasizing noise, reverb or other environmental sounds.
For more details, please also see our blog post on Auphonic Bandwidth Extension.
Listen to Filtering Audio Examples:
https://auphonic.com/features/filtering
Automatic Cutting

Our automatic cutting algorithms detect and remove silent segments, filler words and respiratory noises (coughs, etc.), which occur in your recordings naturally. Usually, listeners do not want to hear silence segments, coughs, sneezes and a lot of filler words. Hence, cutting out these informationless sections is important to achieve a high-quality listening experience.
To control whether audio or video segments are cut or not, you can choose between different Cut Modes:
Apply Cuts: This mode removes all cut segments from the recording.
Set Cuts To Silence: This mode fades cut segments to silence instead of cutting them.
Export Uncut Audio: This mode detects and reports cut segments for further use but does not apply cuts. Once processing is done, you can download the auto-generated “Cut Lists” in various formats and import them into your favorite audio or video editor to review and apply the cuts there.
For manual fine-tuning of individual auto-generated cuts, you can also use our Auphonic Editor to adjust cut positions, deactivate existing or add entirely new cut regions.
When we cut your recordings, we make sure that all chapter marks and speech recognition transcripts are adapted accordingly.
Cutting is also available for video files! You can use the “Apply Cuts” Mode as well as the “Set Cuts To Silence” or the “Export Uncut Audio” Mode for your video recordings.
Listen to Automatic Cutting Audio Examples:
https://auphonic.com/features/automatic-cutting
Cut Silence
A few seconds of silence quickly arise due to short speech breaks, breath pauses, or at the beginning, when the recording equipment has to be adjusted. The silence cutting algorithm reliably detects and cuts silent segments in your recordings while making sure, that intended speech breaks, e.g. between two sentences, remain untouched.
For more details, please also see our blog post on Automatic Silence Cutting.
Cut Fillers
We have trained our filler word cutting algorithm to remove filler words, namely any kind of “uhm”, “uh”, “mh”, “ähm”, “euh”, “eh”, and similar with English, German, and Romance language data. However, the algorithm already works quite well for many similar-sounding languages, and we will also train more languages if necessary.
NOTE: We recommend to use filler cutting always in combination with our Dynamic Denoiser or Speech Isolation algorithms. This is important to remove any reverb or noise, that might cause artifacts during cutting.
For more details, please also see our blog post on Automatic Filler Cutting.
Cut Coughs
If you or your guests are not feeling their best, our cough cutting algorithm can automatically remove respiratory noises, like coughing, throat-clearing, sneezing and similar sounds from your audio or video — keeping your speech recordings clean, professional, and distraction-free.
NOTE: We recommend to use cough cutting always in combination with our Dynamic Denoiser or Speech Isolation algorithms with Remove Breaths enabled. The distinction between heavy breaths and mild cold symptoms is not always clear-cut and this way all respiratory noises will be removed.
For more details, please also see our blog post on Automatic Cough Cutting.
Cut Music
If your project contains foreground music that you want removed — such as intros, outros, or musical interludes — our music-cutting algorithm can automatically detect and cut all music segments, removing those parts entirely and keeping your speech recordings clean and focused.
Please note that the music cutting algorithm is tuned for music segments longer than about 20 seconds. Short segments lasting only a few seconds will not be cut. This is intentional to ensure that only music is removed while all speech remains fully preserved.
Export Cut Lists
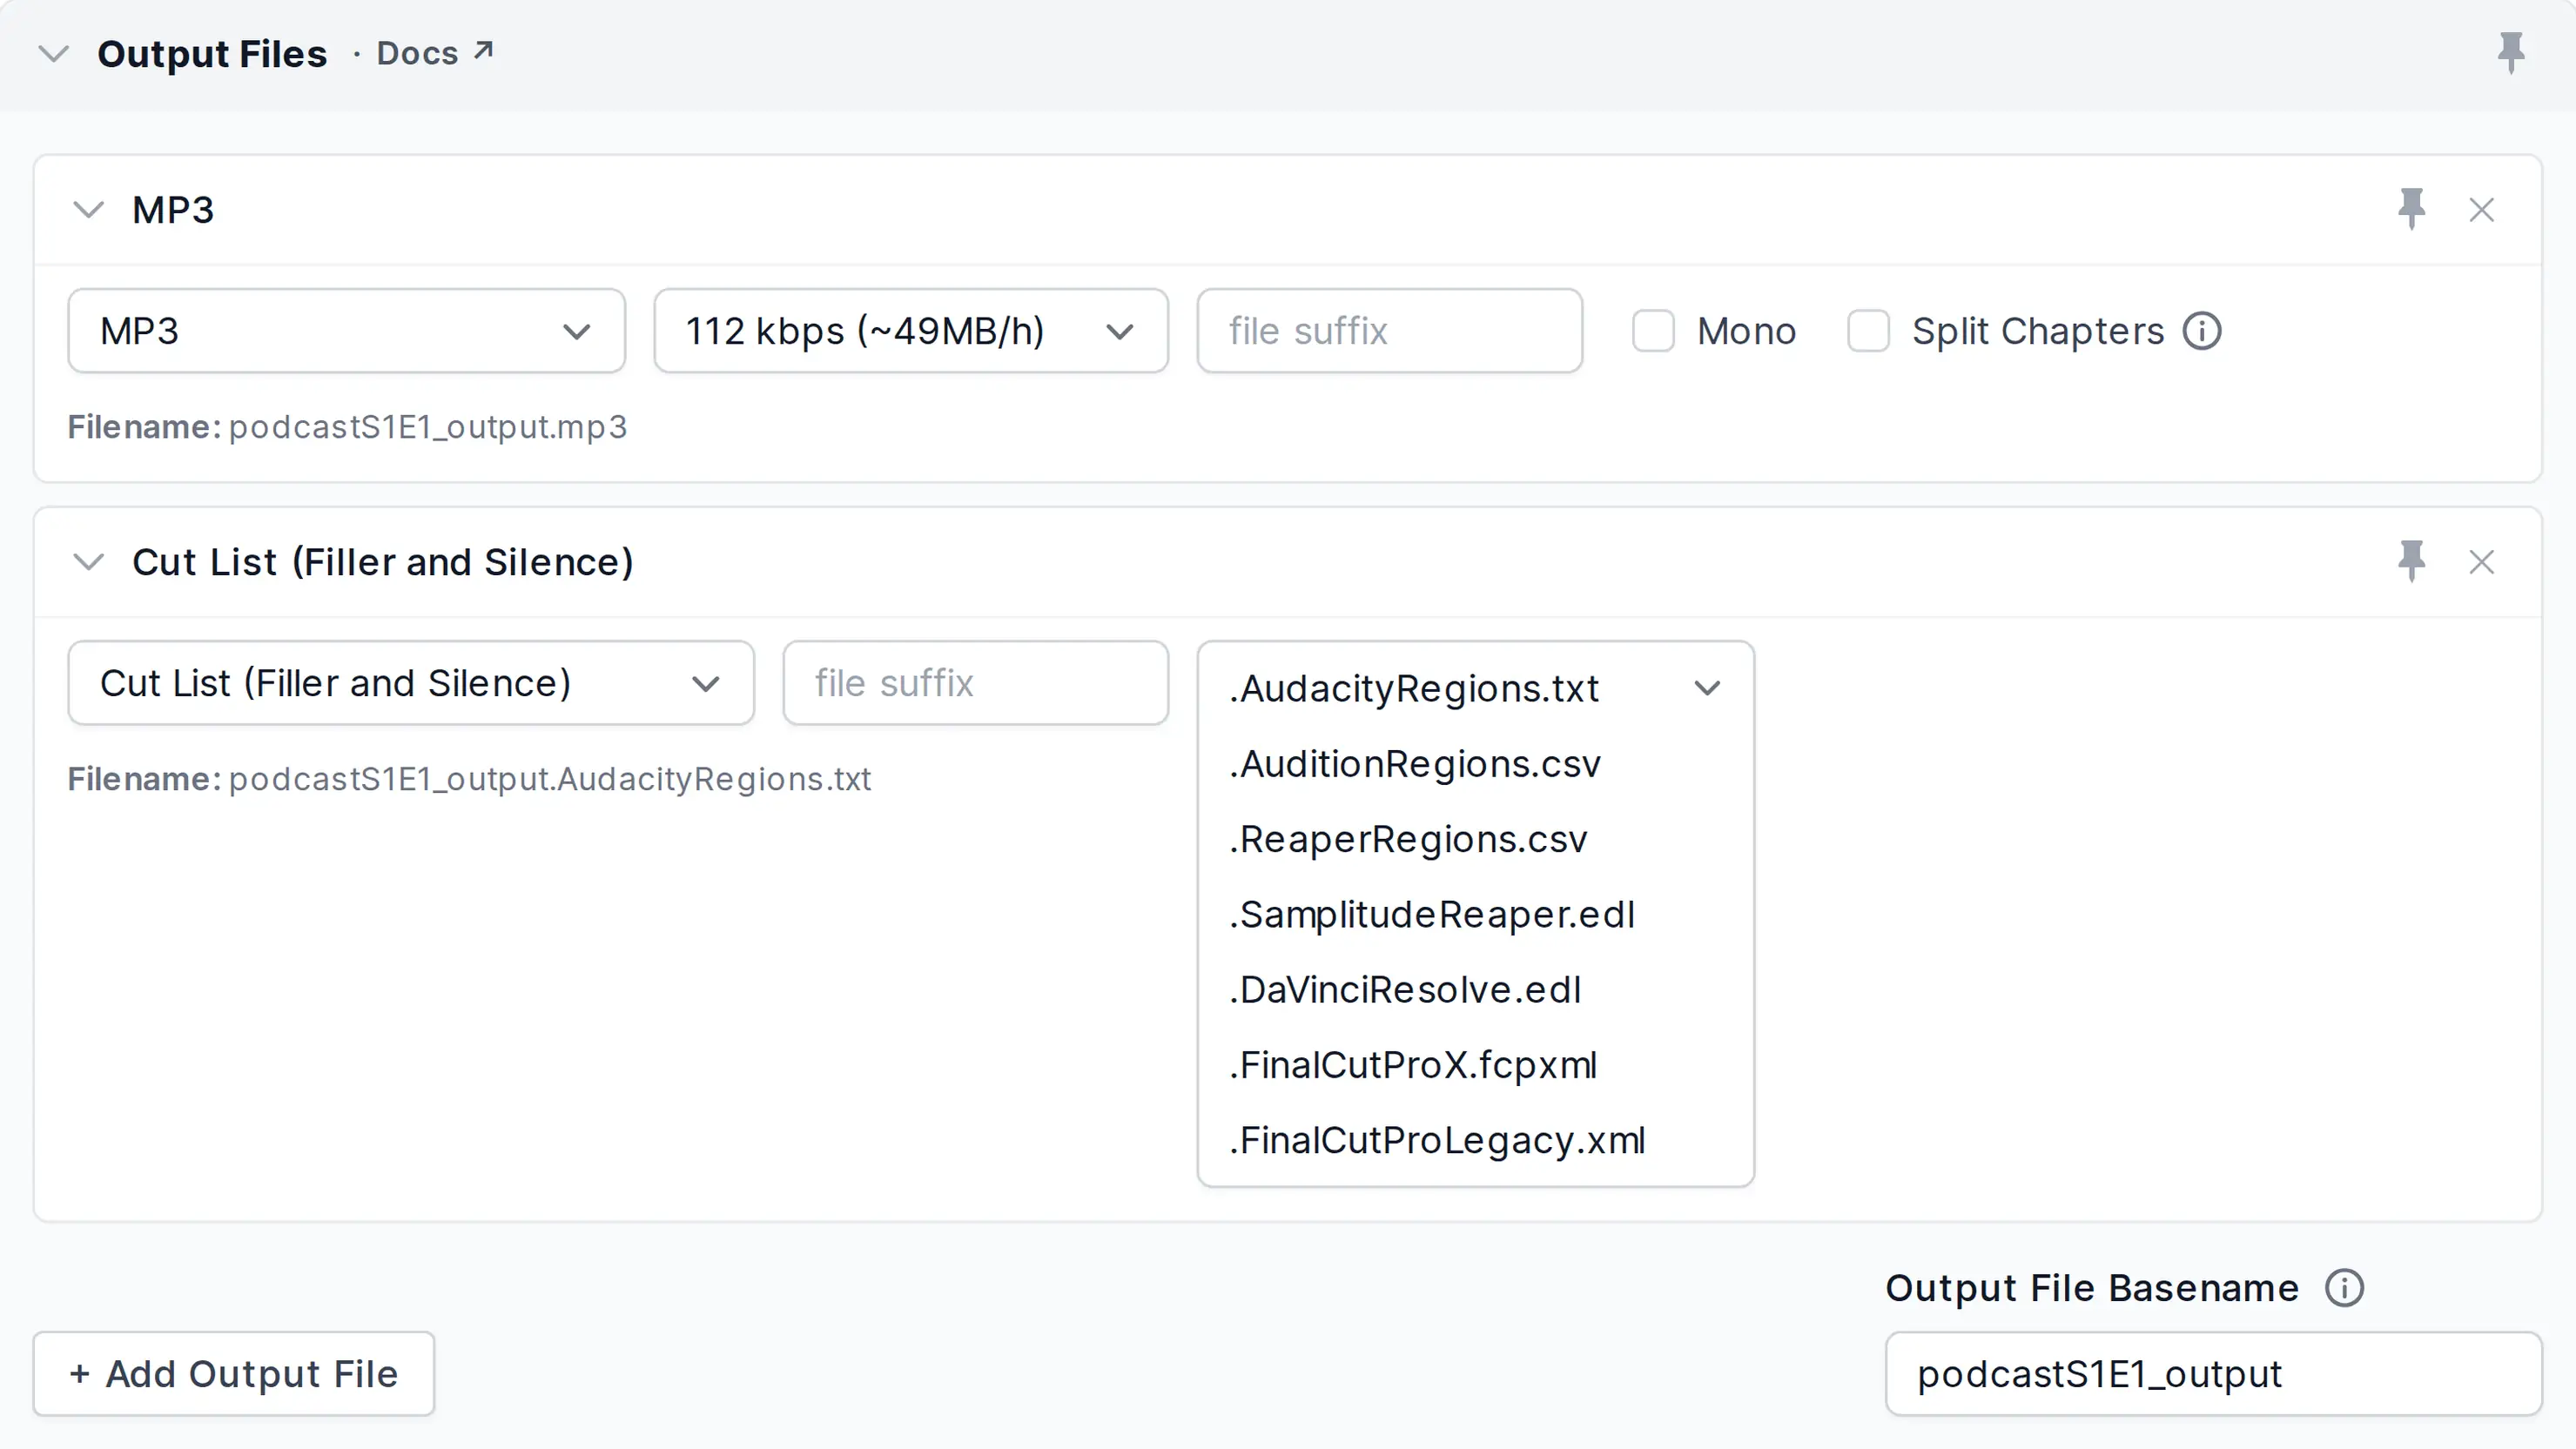
You can add the “Cut List (Filler and Silence)” output in various formats to your Output Files. You can do this independently of the Cut Mode you selected.
The Cut List files will always be relative to your input files! Consider this when you import cut lists to your favourite editor.
Exporting cut lists allows you to import cuts into your favorite audio/video editor to review and apply the cuts manually. To generate the lists, choose “Cut List (Filler and Silence)” in the “Output Files” section. By selecting the correct “Ending” you can export the cut lists in a format that is suitable for your post production audio or video editor.
We support the following region and EDL (edit decision list) formats:
Region formats:
“AudacityRegions.txt” – for Audacity import
“AuditionRegions.csv” – for Audition import
“ReaperRegions.csv” – for Reaper import
Region formats list filler and silence cut regions with their respective start and end timestamps.
You can import those cut region lists into your existing ‘Audacity’, ‘Audition’, or ‘Reaper’ projects. There you can edit the cut positions to your liking by deleting, moving, or adding individual cut positions. After that, you may apply the cuts manually.EDL formats (Edit Decision List):
“SamplitudeReaper.edl” – for Samplitude and Reaper import
“DaVinciResolve.edl” – for DaVinci Resolve import (also known as “cmx3600” format and compatible with various editors)
“FinalCutProX.fcpxml” – for Final Cut Pro X import
“FinalCutProLegacy.xml” – for Final Cut Pro 7 (and previous versions) import
EDL formats can be imported in your software to automatically apply cuts from the EDL file. Depending on the software you use, you may also edit individual cuts manually before applying them. Be aware though that in some editors it may not be possible to add them to an existing project. If this is the case, simply open a new project with the EDL file instead.
NOTE: The cut lists will contain all cuts detected by the enabled Automatic Cutting Algorithms. If neither “Cut Fillers”, “Cut Silence”, “Cut Coughs”, nor “Cut Music” is selected, the cut list will be empty!
For more details, please also see our blog post on Cut Lists Export.
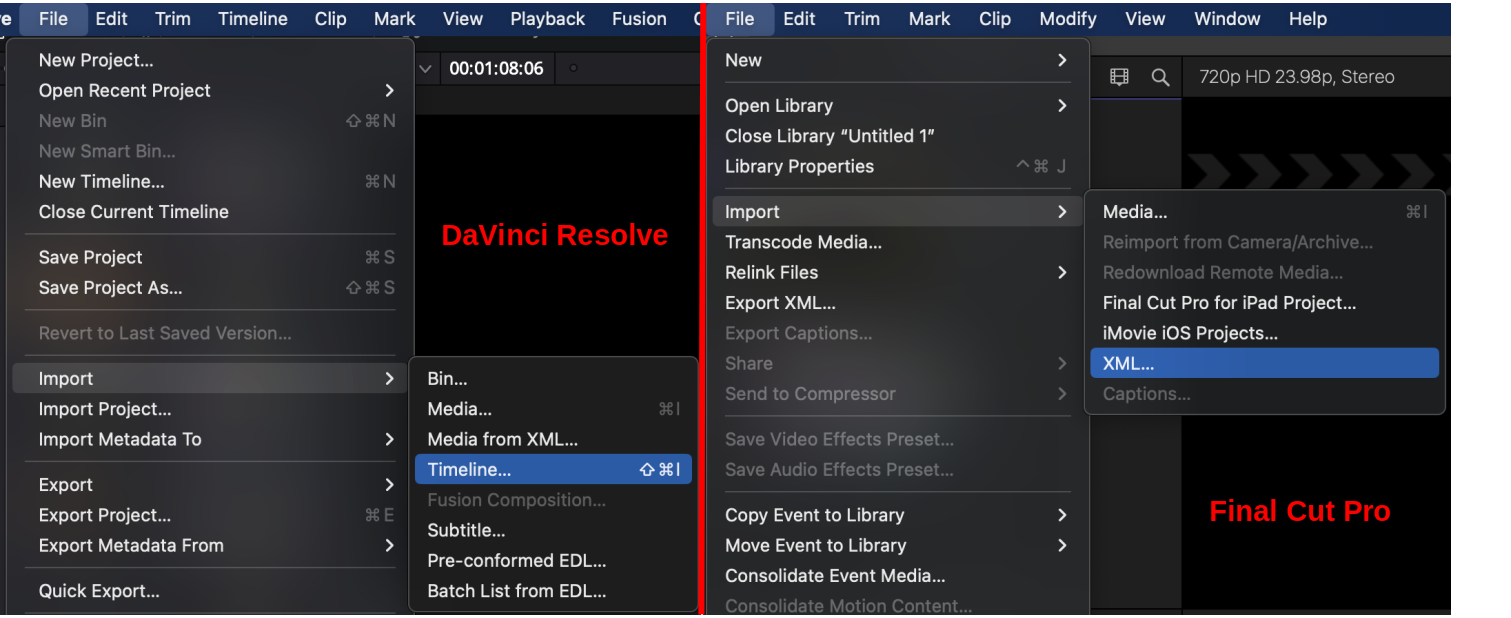
Use Cut Lists
If you want to use your favourite editing software to apply and review the detected cuts rather than our Auphonic Editor, just add the matching cut list format as output file and download it to your media directory. Head to your editor and import the cut list file as a new timeline. This will automatically place and cut your video clip onto a newly created timeline.
For this to work you need to select either the “Set Cuts To Silence” mode or the “Export Uncut Audio” mode in Automatic Cutting. We strongly suggest the “Set Cuts To Silence” mode, as it will avoid audio artifacts.
Also, make sure though that your video file is in the same directory as your cut list file! Otherwise, your video editor won’t be able to locate your video file. Additionally, DaVinci Resolve now requires you to first import the video file (e.g. myvideo.mp4) to the media pool before importing the timeline.
The following screenshot shows how to create a new timeline with your cut list file in DaVinci Resolve (left) and Final Cut Pro (right). Just click on the menu entry which is shown in the screenshot and select your cut list file. Don’t forget to first import the video file in DaVinci Resolve though.