After recording a podcast or speech audio, it is usually necessary to modify the recorded levels. This post illustrates how to normalize the subjective loudness and how to compress the dynamic range (= difference between the loudest and softest sounds) of an audio file.
Loudness normalization is one of the most common misunderstandings in audio post production. Many people use peak normalization, which ensures that the maximum peak (= the maximum value of the audio data) reaches a specific level. However, the human perception of loudness does NOT depend on peak levels, therefore peak normalization is mostly useless. Recordings should be normalized according to its loudness, and not its peak level (see also Peak Normalization: Not the Solution).
The correct calculation of the perceived loudness is actually not that easy, because psychoacoustic properties of human perception must be considered (see e.g. equal-loudness contour, but that's a topic for another blog post). A very rough approximation is the RMS value (= short time quadratic mean of audio data), or even better: use your ears!
There are several reasons for loudness normalization and compression:-
Mid-term loudness:
Different speakers or different regions in a recording might have very unequal loudness levels (e.g. a question from the audience at a conference). The audio engineer should balance the loudness of unequal parts, so that a listener doesn't have to adjust the volume all the time. -
Short-term loudness:
Speech has a very high dynamic range, it consists of very quiet and very loud parts. However, when listening to podcasts on a portable player, in a car or even in the living room, a more uniform volume is preferred, otherwise consonants like "p", "t" or a burst of laughter might be painful for your ears.
Dynamic range compression (compressors) should be used to make the loud parts more quiet and the quiet parts louder. -
Global Loudness:
The overall loudness of your recording should be comparable to previous episodes, to similar podcasts, to radio shows etc. -
Peak Levels:
In digital recordings, the maximum peak level must not be louder than the maximum allowed level, otherwise an awful distortion called clipping occurs. Therefore one must ensure that all peaks are under a specific threshold.
In the following I will briefly describe how to adjust your peak levels, the mid-term, short-term and global loudness. The last section presents practical and detailed instructions, how all steps can be reproduced with the open source audio editor Audacity and some free plugins (on Linux, Windows and Mac).
1. Mid-Term: Leveling
The loudness of different regions in a recording should be unified, so that a listener doesn't
have to adjust the volume all the time.
In live recordings this is often done by a sound engineer, using the faders of an audio mixer.
She/he just listens to the signal and tries to keep a constant loudness.
If the volume of a speaker is too low, the engineer will move the faders up and therefore increases the volume.
However, an engineer must react fast enough on volume changes.
In post production, one can use volume envelopes to simulate the same behavior in a digital audio editor. The following picture shows volume envelope curves in Audacity:
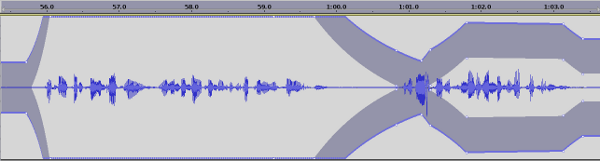
Using volume envelopes it is possible to amplify or lower the volume of different regions and speakers, so that in the end all parts have a similar loudness. This has the advantage, that volume fades can be positioned in an optimal way, but it might be a time consuming process if you are not used to it.
Additionally one should take care that background noises or e.g. loud breathing of speakers are not amplified too much.
2. Short-Term: Loudness Range Compression
A compressor reduces the volume of short and loud spikes (consonants like "p", "t", or laughter)
and the output audio will have a more uniform loudness.
All sounds with levels above the threshold will be reduced. The amount of gain reduction is determined
by the ratio: e.g. if the ratio is 2:1 and the input level is 2dB over the threshold,
the output level will be just 1dB over the threshold (for a detailed parameter description see e.g.
Compressor controls and features).
The following picture illustrates threshold and ratio (picture from MediaCollege):
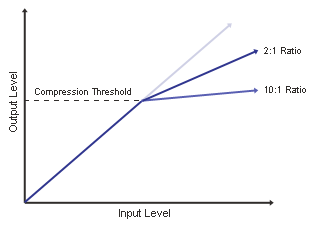
The threshold should be located above the average loudness of your recording, but below the volume of very loud spikes. For example, if the average level is -20dB, the threshold might be in the range of -16dB to -12dB, depending on the loudness range of the material.
Other compressor parameters can be set to standard values for speech, e.g. ratio = 5:1, attack = 5ms, release = 120ms. Feel free to experiment!
3. Global Level Adjustment
Now one should compare the loudness of the normalized audio file to the loudness of other recordings like similar podcasts or radio shows. Raise or lower your volume, until the levels are similar.
After doing this a few times, you will have a reference audio file (maybe one of your old shows) and can compare new recordings just to that one file.
4. Peak Limiting
The final step is the peak limiter. It ensures that the maximum audio peak
level is small enough, so that no clipping or distortion is possible.
You should keep your peaks at least below -1 dBFS, some suggest much more (-3dBFS, -6dBFS, ...).
That's because true peaks are often between samples (intersample peaks)
and data compression algorithms (MP3, OGG, AAC, ...) produce
artifacts at high peak levels.
Tools
All necessary operations should be possible with any modern audio editor.
In the following I will describe how to reproduce all steps with
the free and open source audio editor Audacity.
Some LADSPA audio plugins are also required, because the current version of Audacity
does not include a sufficient compressor and limiter.
On Windows or Mac install the LADSPA plugins bundle as described at Audacity Plugins,
on Linux install the swh-plugins (apt-get install swh-plugins on Ubuntu/Debian).
-
Volume Envelopes:
Select the Envelope Tool from the Tools Toolbar, for more information see Using the Envelope Tool or Audacity Manual Envelope Tool. -
Loudness Measurement (optional):
You can use the Contrast Tool to calculate the average level (under Analyze -> Contrast). Select your audio and measure the volume, then you get a value in dB. This might help you while searching for the right compressor threshold. -
Compressor:
A good compressor is the SC4 (or SC4 mono) compressor by Steve Harris (LADSPA plugin), you find it somewhere in Effects -> Plugins.
Set the threshold as described above and the other parameters to e.g. ratio = 1:5, attack = 5ms, release = 120ms, knee = 3.5dB, RMS/peak = 0, makeup gain = 0dB. -
Level Adjustment:
For global level adjustments you can use Effects -> Amplify (allow clipping, we have a limiter afterwards) or the gain control from the control panel of the audio track. -
Peak Limiter:
Use the Fast Lookahead Limiter by Steve Harris (LADSPA plugin), you find it in Effects -> Plugins. Set the limit to -1dB or lower, input gain to 0dB and the release time to e.g. 0.12 seconds.
Another interesting tool is the Levelator.
It tries to automate all the discussed steps and does it very nice. So if you just want
to throw your audio in and get it back with good levels, use this program.
But be careful, it might produce common artifacts like pumping and also amplifies
unwanted sounds like breathing, background noises etc.
Summary
I hope you are convinced now that peak normalization is not the same as loudness normalization and should be avoided.
A detailed loudness post production of podcasts or speech audio should involve the following step:- Leveling: Bring different parts to a uniform volume.
- Dynamic range compression: Use a compressor to lower the volume of short and loud spikes.
- Global volume adaptation: Raise or lower the volume of the whole audio file to a similar loudness level than other programs.
- Peak limiter: Limit all peaks to at least -1dBFS to avoid clipping.